How to Change WiFi Name and Password of Netgear Extender?
Netgear range extender – The name is enough to attract any freeloader to break into your home WiFi network. Risks of your WiFi network getting hacked are more if your extender is still functioning on the default values of the WiFi name; also known as SSID and the network key i.e. the WiFi password. For your knowledge, the information regarding the default SSID and WiFi password is not only revolving around the internet but it is also mentioned on the label of your range extender. So, it won’t be a dark art for a freeloader, especially when he/she is your guest to connect to the WiFi network. The best solution to rule this person out is to change the default WiFi details. Do you know how to change WiFi name and password of your Netgear extender? Well, this is what has been discussed in this write-up. With that said, stick to reading.
Before You Change WiFi Name and Password
It is necessary to get acquainted with the prerequisites of the process before employing the steps in real-time. Given below are the materials and information that you need to gather before starting the process to change the WiFi details i.e. the SSID and password of your Netgear wireless range extender.
I. The Default IP Address: The first thing you will need to change the WiFi network details of your extender is its IP address. It will take you to the door that when unlocked will take you to the extender’s web-based setup wizard. That door is none other than the Netgear extender login page. You are free to take the aid of the mywifiext login address if you do not want to proceed using the default IP address.
II. An Ethernet Cable: The process of changing the WiFi password and SSID of a range extender will require an Ethernet cable too. It is because a wired connection between two devices is always reliable than a wireless one and it will prevent you from facing issues while accessing the Netgear Genie dashboard. But, be sure that you pick a non-damaged Ethernet cable. Otherwise, it will not be of any good.
III. The Admin Details: All Netgear range extenders run on the default password admin. Therefore, if it has never been changed by you, use it to log in to the extender. For your information, the password needs to be entered in lowercase. In case you have changed the admin password, consider using the new one. But, make sure that you do not commit any typing mistakes while entering it.
So, these were the things you need to arrange before changing the WiFi name and password of the Netgear extender. We are assuming that you have gotten your hands before them. Thus, the process can be initiated now. Read the steps given in the next section to know how to change WiFi name and password of Netgear range extender.
How to Change WiFi Password and SSID of Extender?
- Start the process by powering down your router and creating an Ethernet connection between your WiFi devices (router and extender).
- Your extender is also supposed to be turned off during the connection creation process.
- After waiting for 10-15 minutes, you are required to switch on your WiFi devices.
- Let the LED lights on them gain some stability.
- Switch on your computer and connect it to the default network name i.e. Netgear_ext.
- The WiFi password can be located on the extender’s label or the user guide.
- Now, you need to open an internet browser and type the extender’s IP address.
- Be sure to input the IP into the URL field of the browser.
- Upon hitting Enter, you will find yourself on the admin page of the range extender.
- Using the valid admin password and username, complete the extender login process.
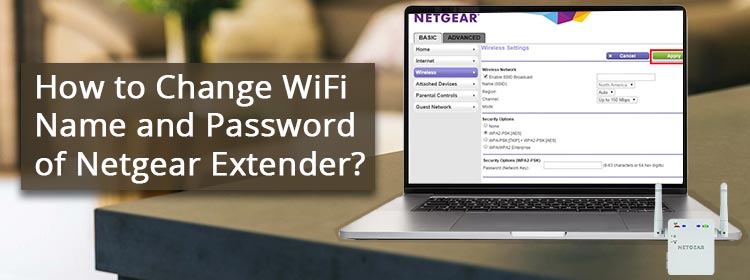
- The Netgear Genie setup wizard or the BASIC Home screen opens up.
- Select the Setup tab and click the Wireless Settings option.
- Enter the new WiFi name into the SSID field and the password into the field labeled Network Key.
- You might also be asked to choose your region.
- After filling in the required information, save the changes.
- This can be done by clicking Apply.
This is how to change WiFi name and password of Netgear extender. After the process is completed, your client devices will get disconnected from the home network. Therefore, you need to connect them again using the new WiFi details.
Verdict
Changing the WiFi details is among the greatest initiatives taken by users to safeguard their WiFi network. We are hopeful that you have learned how to change WiFi name and password of Netgear extender. But, know that the menus and the fields may vary depending on the extender model you own. So, be sure to have a look at the user manual of your device before you implement any knowledge regarding how to change WiFi password and other network settings.